Challenge 2: Your first flow that analyses the user’s input
Previous Challenge Next Challenge
Introduction
Remember that the Movie Guru app presents the user with a list of their long-term likes and dislikes. The app learns this by analysing the user’s conversation for utterances of their preferences and extracts them. The app stores these extracted preferences in the Postgres db and retrieves them whenever the user loads the app. In this challenge, you will be building the flow that does the analysis and extraction (persisting to the db is not a part of this challenge).
This is your first prompt engineering challenge. The goal is to create the prompt (dotPrompt) required to extract strong preferences and dislikes from the user’s statement. We want the model to take a user’s statement, and potentially the agent’s previous statement (if there is one) and extract the following:
- List of recommendations from the model about what it expects the user really likes or dislikes based on the user’s latest statement. Each recommendation contains the following information:
- Item: The (movie related) item the user expressed a strong sentiment about. Eg: A genre, an actor, director etc.
- Reason: The justification from the model to have extracted that specific item.
- Category: The category of the item. Eg: Genre, Actor, Director, or Other.
- Sentiment: The user’s sentiment about the item. Positive or Negative.
- Explanation: General explanation of the overall output. This will help you understand why the model made its suggestions and help you debug and improve your prompt.
You need to perform the following steps:
- Create a dotPrompt that outputs the information mentioned above. The model takes in a user’s query and a preceeding agentMessage (if present).
- Update the prompt in the codebase (look at instructions in GoLang or TypeScript) to see how.
- Use the Genkit UI (see steps below) to test the response of the model and make sure it returns what you expect.
What is a Dotprompt?
Dotprompts are a way to write and manage your AI prompts like code. They’re special files that let you define your prompt template, input and output types (could be basic types like strings or more complex custom types), and model settings all in one place. Unlike regular prompts, which are just text, Dotprompts allow you to easily insert variables and dynamic data using Handlebars templating. This means you can create reusable prompts that adapt to different situations and user inputs, making your AI interactions more personalized and effective. This makes it easy to version, test, and organize your prompts, keeping them consistent and improving your AI results.
Note
The working Movie Guru app and prompts have been tested for gemini-1.5-flash, but feel free to use a different model.
Description
Genkit provides a CLI and a GUI that work together to help you develop and manage generative AI components. They are tools designed to streamline your workflow and make building with LLMs more efficient. We’re going to set it up in this step and keep using it for the remainder of the challenges.
You can do this with GoLang or TypeScript. Refer to the specific sections on how to continue.
GoLang Basic Flow
Pre-requisites
When you start the Genkit GUI, it starts up your flow server locally (go to chat_server_go/cmd/standaloneFlows/main.go). You should see code that looks like this:
 if err := genkit.Init(ctx, &genkit.Options{FlowAddr: ":3401"}); err != nil {
  log.Fatal(err)
 }
When you run genkit start in the directory where your Genkit server code is located (chat_server_go/cmd/standaloneFlows/main.go), it starts up the Genkit flows server defined in your Go code, and a GUI to interact with the GenAI components defined in your code.
The normal workflow is to install the necessary components on your local machine. Given that this lab have minimal (pre) setup requirements (only docker and docker compose), we choose to run the genkit CLI and GUI through a container which adds a couple of extra setup steps, but ensures consistency across different lab setups.
For these challenges, you do not need to have the full Movie Guru app running, we are just going to work with the flows.
-
From the root of the project directory run the following:
docker compose -f docker-compose-genkit.yaml up -d genkit-go # running just the genkit-go service -
Once the service has started up, we are going to exec into the container’s shell. The reason we are not using genkit start as a startup command for the container is that it has an interactive step at startup that cannot be bypassed. So, we will exec into the container and then run the command genkit start.
docker compose -f docker-compose-genkit.yaml exec genkit-go sh -
This should open up a shell inside the container at the location /app/cmd/flows.
Note
In the docker compose file, we mount the local directory chat_server_go/cmd/standaloneFlows into the container at app/cmd/standaloneFlows, so that we can make changes in the local file system, while still being able to execute genkit tools from a container.
-
Inside the container, run
genkit start -
You should see something like this in the termimal
Genkit CLI and Developer UI use cookies and similar technologies from Google to deliver and enhance the quality of its services and to analyze usage. Learn more at https://policies.google.com/technologies/cookies Press "Enter" to continue -
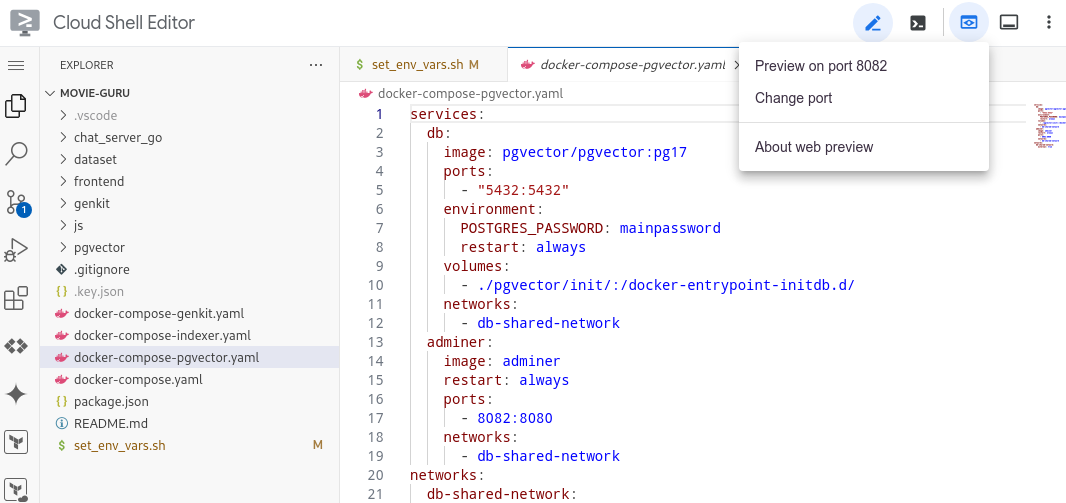
Then press ENTER as instructed (this is the interactive step mentioned earlier). This should start the genkit server inside the container at port 4000 which we forward to port 4002 to your host machine (in the docker compose file).
Note
If you are using the GCP CloudShell Editor, click on the webpreview button and change the port to 4002.
Note
Wait till you see an output that looks like this. This basically means that all the Genkit has managed to load the necessary go dependencies, build the go module and load the genkit actions. This might take 30-60 seconds for the first time, and the process might pause output for several seconds before proceeding. Please be patient.
[Truncated]
go: downloading golang.org/x/oauth2 v0.21.0
go: downloading [cloud.google.com/go/auth](https://cloud.google.com/go/auth) v0.7.0
go: downloading [cloud.google.com/go/auth/oauth2adapt](https://cloud.google.com/go/auth/oauth2adapt) v0.2.2
go: downloading [github.com/google/s2a-go](https://github.com/google/s2a-go) v0.1.7
go: downloading [github.com/felixge/httpsnoop](https://github.com/felixge/httpsnoop) v1.0.4
go: downloading [github.com/golang/protobuf](https://github.com/golang/protobuf) v1.5.4
go: downloading [github.com/golang/groupcache](https://github.com/golang/groupcache) v0.0.0-20210331224755-41bb18bfe9da
time=2024-10-05T10:19:57.855Z level=INFO msg="host=34.90.202.208 user=minimal-user password=1FO57mVLNe2ybpdZ port=5432 database=fake-movies-db"
DB opened successfully
[Truncated]
time=2024-10-05T10:19:58.045Z level=INFO msg=RegisterAction type=prompt name=dotprompt/movieFlow
time=2024-10-05T10:19:58.045Z level=INFO msg=RegisterAction type=flow name=movieQAFlow
time=2024-10-05T10:19:58.045Z level=INFO msg="starting reflection server"
time=2024-10-05T10:19:58.045Z level=INFO msg="starting flow server"
time=2024-10-05T10:19:58.045Z level=INFO msg="server listening" addr=127.0.0.1:3100
time=2024-10-05T10:19:58.046Z level=INFO msg="all servers started successfully"
time=2024-10-05T10:19:58.046Z level=INFO msg="server listening" addr=:3401
time=2024-10-05T10:19:58.300Z level=INFO msg="request start" reqID=1 method=GET path=/api/__health
time=2024-10-05T10:19:58.300Z level=INFO msg="request end" reqID=1
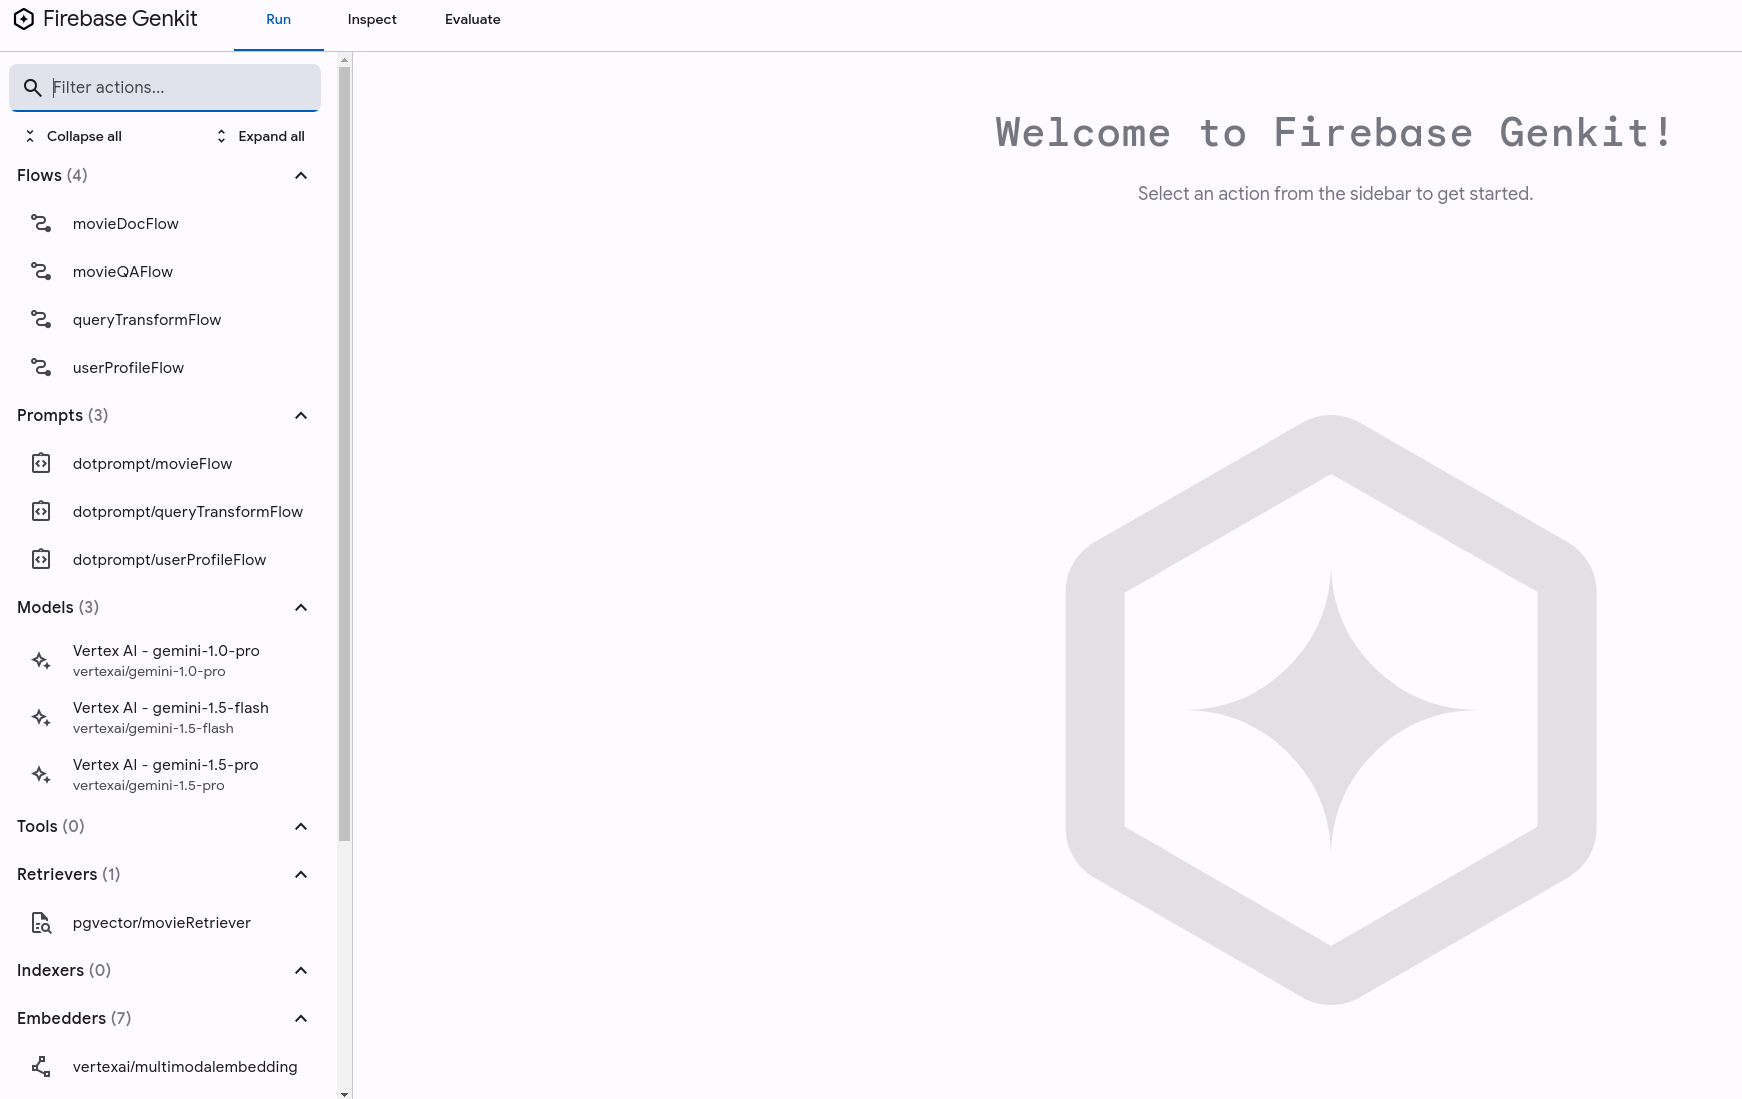
Genkit Tools UI: http://localhost:4000
-
Once up and running, navigate to http://localhost:4002 in your browser. This will open up the Genkit UI. you should see a screen that looks like this:
Warning
Potential error message: At first, the genkit ui might show an error message and have no flows or prompts loaded. This might happen if genkit has yet had the time to detect and load the necessary go files. If that happens, go to chat_server_go/cmd/standaloneFlows/main.go, make a small change (add a newline) and save it. This will cause the files to be detected and reloaded.
Challenge-steps
-
Go to chat_server_go/cmd/standaloneFlows/main.go. You should see code that looks like this in the method getPrompts().
// Look at the prompt in the code file, markdown might not render it properly. userProfilePrompt := ` Inputs: 1. Optional Message 0 from agent: 2. Required Message 1 from user: Just say hi in a language you know. ` - Keep this file (main.go) open in the editor. You will be editing the prompt here, and testing it in the genkit UI.
- From the Genkit UI, go to Prompts/dotprompt/userProfileFlow.
-
You should see an empty input to the prompt that looks like this:
{ "query": "", "agentMessage": "" } - You should also see an uneditable prompt (the same prompt in main.go) below. You need to edit this prompt in main.go but can test it out by changing the input, model and other params in the UI.
- Test it out: Add a query “I want to watch a movie”, and leave the agentMessage empty and click on RUN.
- The model should respond by greeting you in a random language (this is what the prompt asks it to do).
- You need to rewrite the prompt (in main.go) and test the model’s outputs for various inputs such that it does what it is required to do (refer to the goal of challenge 2). Edit the prompt in main.go and save the file. The updated prompt should show up in the UI. If it doesn’t just refresh the UI. You can also play around with the model parameters.
TypeScript Basic Flow
Prerequisites
When you start the genkit GUI, it starts up your flow server locally (go to js/flows-js/src/index.ts). You should see code that looks like this:
export {UserProfileFlowPrompt, UserProfileFlow} from './userProfileFlow'
export {QueryTransformPrompt, QueryTransformFlow} from './queryTransformFlow'
export {MovieFlowPrompt, MovieFlow} from './movieFlow'
export {movieDocFlow} from './docRetriever'

startFlowsServer();
When you run genkit start from the directory where your genkit server code is located (js/flows-js/src/), it starts up the genkit flows server defined in your code, and a GUI to interact with the GenAI components defined in your code. The normal workflow is to install the necessary components on your local machine. Given that this lab have minimal (pre) setup requirements (only docker and docker compose), we choose to run the genkit CLI and GUI through a container which adds a couple of extra setup steps, but ensures consistency across different lab setups.
For this challenge, you do not need to have the **Movie Guru** app running, we are just going to work with the flows.
-
From the root of the project directory run the following:
docker compose -f docker-compose-genkit.yaml up -d genkit-js # running just the genkit-js service -
Once the service has started up, we are going to exec into the container. The reason we are not using genkit start as a startup command for the container is that it has an interactive step at startup that cannot be bypassed. So, we will exec into the container and then run the command genkit start.
docker compose -f docker-compose-genkit.yaml exec genkit-js sh -
This should open up a shell inside the container at the location /app.
Note
In the docker compose file, we mount the local directory js/flows-js into the container at /app, so that we can make changes in the local file system, while still being able to execute genkit tools from a container.
-
Inside the container, run
npm install genkit start -
You should see something like this in your terminal
Genkit CLI and Developer UI use cookies and similar technologies from Google to deliver and enhance the quality of its services and to analyze usage. Learn more at https://policies.google.com/technologies/cookies Press "Enter" to continue - Then press ENTER as instructed (this is the interactive step mentioned earlier).
- This should start the genkit server inside the container at port 4000 which we forward to port 4003 to your host machine (in the docker compose file).
Note
Wait till you see an output that looks like this. This basically means that all the Genkit has managed to load the necessary go dependencies, build the go module and load the genkit actions. This might take 30-60 seconds for the first time, and the process might pause output for several seconds before proceeding. Please be patient.
> flow@1.0.0 build
> tsc
Starting app at `lib/index.js`...
Genkit Tools API: http://localhost:4000/api
Registering plugin vertexai...
[TRUNCATED]
Registering retriever: movies
Registering flow: movieDocFlow
Starting flows server on port 3400
    - /userProfileFlow
    - /queryTransformFlow
    - /movieQAFlow
    - /movieDocFlow
Reflection API running on http://localhost:3100
Flows server listening on port 3400
Initializing plugin vertexai:
[TRUNCATED]
Registering embedder: vertexai/textembedding-gecko@001
Registering embedder: vertexai/text-embedding-004
Registering embedder: vertexai/textembedding-gecko-multilingual@001
Registering embedder: vertexai/text-multilingual-embedding-002
Initialized local file trace store at root: /tmp/.genkit/8931f61ceb1c88e84379f345e686136a/traces
Genkit Tools UI: http://localhost:4000
-
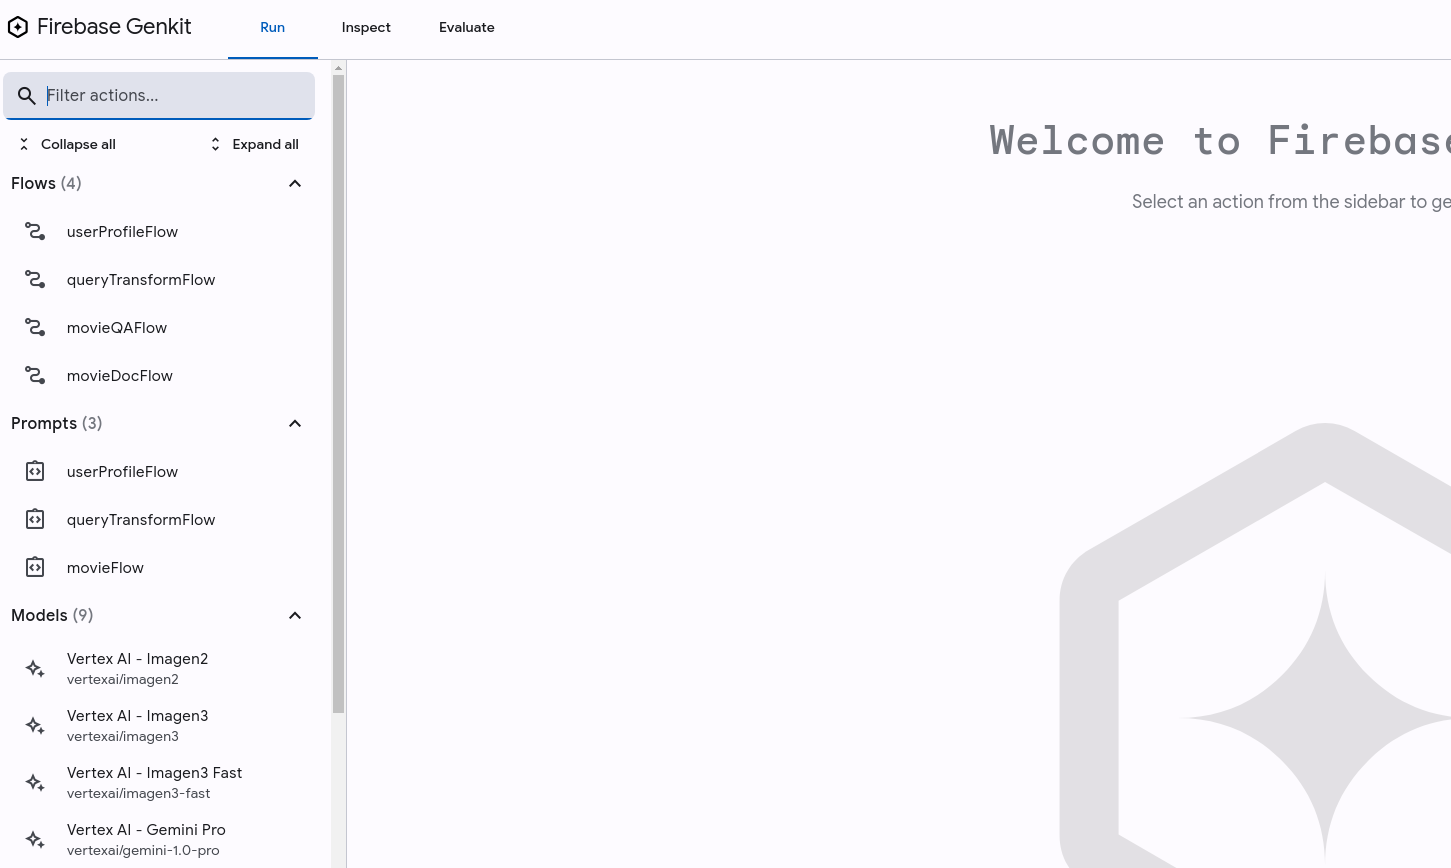
Once up and running, navigate to http://localhost:4003 in your browser. This will open up the Genkit UI. It will look something like this:
Note
If you are using the GCP CloudShell Editor, click on the webpreview button and change the port to 4003.
Warning
Potential error message: At first, the genkit ui might show an error message and have no flows or prompts loaded. This might happen if genkit has yet had the time to detect and load the necessary go files. If that happens, go to js/flows-js/src/index.ts, make a small change (add a newline) and save it. This will cause the files to be detected and reloaded.
Challenge-steps
-
Go to js/flows-js/src/prompts.ts. You should see code that looks like this in the method getPrompts().
export const UserProfilePromptText = ` Inputs: 1. Optional Message 0 from agent: {{agentMessage}} 2. Required Message 1 from user: {{query}} ` - Keep this file (prompts.ts) open in the editor. You will be editing the prompt here, and testing it in the genkit UI.
- From the Genkit UI, go to Prompts/userProfileFlow.
-
You should see an empty input to the prompt that looks like this:
{ "query": "", "agentMessage": "" } - You should also see an uneditable prompt (the same prompt in prompts.ts) below. You need to edit this prompt in prompts.ts but can test it out by changing the input, model and other params in the UI.
- Test it out: Add a query “I want to watch a movie”, and leave the agentMessage empty and click on RUN.
-
The model should respond by saying something like this. This is clearly nonsensical as a “Movie Recommendation” is not an item that describes a user’s specific movie interests. The model is just retrofitting the output to match the output schema we’ve suggested (see UserProfileFlow.ts, we define an output schema) and trying to infer some semi-sensible outputs.
{ "profileChangeRecommendations": [ { "item": "Movie Recommendations", "reason": "You expressed interest in watching a movie.", "category": "OTHER", "sentiment": "POSITIVE" } ], "justification": "The user expressed interest in watching a movie, so I recommend movie recommendations." } - You need to rewrite the prompt (in prompts.ts) and test the model’s outputs for various inputs such that it does what it is required to do (refer to the goal of challenge 2). Edit the prompt and save the file. The updated prompt should show up in the UI. If it doesn’t just refresh the UI. You can also play around with the model parameters.
Success Criteria
Note
What to do if you’ve made the necessary change in the code files and still see weird output in the UI? Changing the code in the code files should automatically refresh it in the UI. Sometimes, however, genkit fails to autoupdate the prompt/flow in the UI after you’ve made the change in code. Hitting refresh on the browser (afer you’ve made and saved the code change) and reloading the UI page should fix it.
- The model should be able to extract the user’s sentiments from the message.
-
The model should be able output all the required fields with the correct values (see introduction). The input of:
 {
     "agentMessage": "",
     "query": "I really like comedy films."
 }
Should return a model output like this (or json formatted with typescript):
## New Profile Item: **Category:** GENRE **Item Value:** Comedy **Reason:** The user explicitly states "I really like comedy films," indicating a strong and enduring preference for this genre. **Sentiment:** POSITIVE -
The model should be able to pick up categorise sentiments as Postive and Negative.
The input of:{ "agentMessage": "", "query": "I really hate comedy films." }Should return a model output like this:
## New Profile Item: **Category:** GENRE **Item:** Comedy **Reason:** The user explicitly states "I really hate comedy films." This indicates a strong, enduring dislike for the genre. **Sentiment:** NEGATIVE -
The model should ignore weak/temporary sentiments.
The input of:{ "agentMessage": "", "query": "I feel like watching a movie with Tom Hanks." }Should return a model output (something) like this:
I cannot extract any new likes or dislikes from this user message. The user is expressing a current desire to watch a movie with Tom Hanks, but this does not necessarily indicate a long-term preference for him. The user may simply be in the mood for a Tom Hanks film right now, without actually having a strong enduring like for his movies. -
The model should be able to pick up multiple sentiments.
The input of:{ "agentMessage": "", "query": "I really hate comedy films but love Tom Hanks." }Should return a model output like this:
Here's the breakdown of the user's message: **Extracted Profile Items:** * **Category:** GENRE * **Item:** Comedy * **Reason:** The user explicitly states "I really hate comedy films." * **Sentiment:** NEGATIVE * **Category:** ACTOR * **Item:** Tom Hanks * **Reason:** The user explicitly states "love Tom Hanks." * **Sentiment:** POSITIVE **Explanation:** The user expresses strong, enduring feelings about both comedy films and Tom Hanks. "Really hate" and "love" indicate strong, long-term preferences. -
The model can infer context
 {
     "agentMessage": "I know of 3 actors: Tom Hanks, Johnny Depp, Susan Sarandon",
     "query": "Oh! I really love the last one."
 }
Should return a model output like this:
 ## New Profile Item:
 **Category:** ACTOR
 **Item:** Susan Sarandon
 **Reason:** The user explicitly states "I really love the last one," referring to Susan Sarandon, indicating a strong and enduring liking.
 **Sentiment:** POSITIVE